

Learning photography can feel a little messy at first. There are buttons everywhere, the menu seems never-ending, and somehow the camera still takes a dark or blurry photo when everything looks fine to the eye. That is normal. Every photographer has stood there, clicked a photo, checked the screen, and thought, “Well, that did not work.”
The good news is that camera settings for beginners do not have to be confusing. Once a person understands a few basic controls, the camera starts feeling less like a machine and more like a creative tool. Manual mode becomes easier too, because it is not about guessing. It is about knowing which setting changes brightness, which one freezes movement, and which one creates that soft background everyone likes.
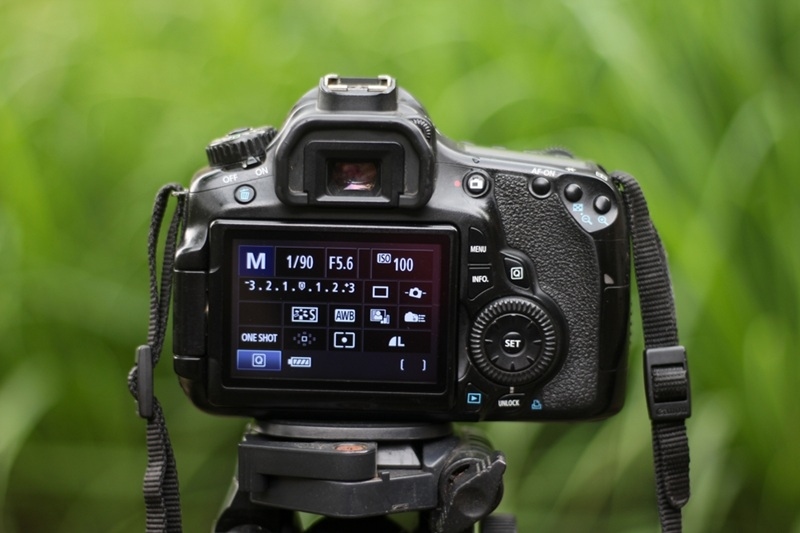
Before jumping into manual shooting, it helps to ask one simple question: what is manual mode photography? In simple words, it means the photographer controls the major settings instead of letting the camera decide everything. The camera still helps with focus, metering, and previews, but the final creative choices stay in human hands.
If the lighting does not change every second manual mode is useful. Good examples are indoor portraits, product photos, sunset shots, night photography, studio style setups. In these situations, the photographer can set the exposure once and continue shooting with consistent results.
It may not always be ideal for fast street photography or sudden action, especially at the beginning. That is fine. A beginner does not need to use manual mode all the time. The goal is to understand it well enough to choose it with confidence.
The exposure triangle for beginners is simply the relationship between ISO, aperture, and shutter speed. When one side changes, the others may need to shift too. Think of it like balancing three taps of light. Open one too much, and the photo may become too bright. Close one too far, and the image may become too dark.
For example, if a beginner wants a blurry background for a portrait, they may choose f/2.0. That aperture lets in more light, so the shutter speed may need to become faster or the ISO may need to stay low. If they want to photograph a running dog, they may choose 1/1000 shutter speed. Since that speed lets in less light, they may need a wider aperture or higher ISO.
A beginner can start with these rough settings:
These are not strict rules. They are starting points, and photography always involves a bit of adjustment.
Manual mode becomes easier when beginners follow a process instead of changing random settings. First, they should decide what matters most in the photo. Is the subject moving? Start with shutter speed. Is background blur important? Start with aperture. Is the light low? Check ISO early.
After that, take a test photo. Look at the brightness on the screen, but do not depend only on it. The screen can look brighter or darker depending on the environment. The histogram is more reliable. If most of the graph is pushed too far left, the photo may be too dark. If it is pushed too far right, highlights may be blown out.
This is where camera settings for beginners become more practical. Instead of memorizing numbers, beginners learn to read the scene. A bright beach needs different settings than a dim café. A still flower needs different settings than a child running across the garden.
Many beginners also wonder how to shoot in RAW format and whether it really matters. RAW files save more image data than JPEG files. That means the photographer gets more room to fix exposure, adjust color, recover shadows, and correct white balance later.
To turn it on, the photographer usually needs to open the camera menu, find image quality, and select RAW or RAW plus JPEG. RAW plus JPEG is a nice option for beginners because it gives an easy-to-share file and a flexible editing file at the same time.
RAW files are larger, so memory cards fill faster. They also need editing before final use. Still, for important photos, travel work, portraits, and low-light scenes, RAW can make a real difference.
On a Similar Note: Travel Photography Tips for Budget-Friendly Adventurers
RAW teaches beginners what is possible after the shot. A slightly dark image may still be saved. A warm indoor color cast can be corrected. Details in shadows may come back nicely. It does not fix everything, of course, but it gives more space to learn without losing every imperfect photo.
Manual mode is mostly about exposure, but a few extra settings matter too. White balance controls color temperature. Auto white balance works well most of the time, but indoor bulbs, shade, and golden-hour light can confuse the camera. If photos look too yellow or too blue, white balance is worth checking.
Focus mode also changes the result. Single autofocus works well for still subjects. Continuous autofocus is better for moving subjects. For portraits, focusing on the eye usually gives the best result. For landscapes, focusing around one-third into the scene can help keep more of the frame sharp.
Metering tells the camera how to read light. Evaluative or matrix metering is a safe everyday option. Spot metering is useful when the subject is much brighter or darker than the background.
At this stage, understanding camera modes becomes useful again. A beginner may use Aperture Priority while learning focus, then move into full manual when comfortable. There is no shame in moving step by step.
Most early mistakes are easy to fix. The first one is using shutter speed that is too slow. If photos look blurry even when the subject is still, camera shake may be the reason. A safe rule is to keep shutter speed at least equal to the lens length. With a 50mm lens, 1/60 or faster is usually safer.
Another mistake is keeping ISO too low indoors. Many beginners fear grain, so they shoot at ISO 100 in poor light and end up with blurry photos. A slightly grainy sharp photo is often better than a clean blurry one.
Beginners also forget to reset settings. Someone may shoot a night scene at ISO 3200, then walk outside the next day and wonder why the photo looks too bright. It happens. A quick settings check before every shoot saves a lot of frustration.
Practice works best when it is simple. A beginner can place a cup near a window and test different apertures. Then photograph a moving fan or passing bike to see how shutter speed changes motion. Later, they can shoot the same scene at ISO 100, 800, and 3200 to compare image noise.
This is a better way to understand what are ISO, aperture, and shutter speed? because it turns theory into something visible. The numbers stop being random once the photographer sees what each one does.
Manual mode is not learned in one afternoon. It builds slowly. One day the settings feel clumsy, and then suddenly, they start making sense. That small moment is worth the effort.
Read More: When to Shoot Photos: Golden Hour Photography Tips
The best way to learn manual photography is to keep it practical. Start with one setting, take a test shot, adjust, and repeat. The exposure triangle for beginners may sound technical, but it is really just a way to balance light and creative control.
Anyone asking what is manual mode photography? should remember this: it is not about being perfect. It is about taking charge of the image. Once a beginner learns how to shoot in RAW format, adjust exposure, choose focus modes, and read light, the camera becomes far less intimidating.
Good photos do not come from perfect settings alone. They come from attention, patience, and a willingness to keep trying when the first shot looks ordinary.
Prime lenses can be useful because they often have wide apertures that let in more light and create more background blur. A 50mm f/1.8 lens is popular for beginners as it is affordable, light and sharp. It also teaches composition well as the photographer has to move around rather than zoom from one spot.
To keep photos sharp, beginners should keep the camera close to the body, tuck in the elbows, and press the shutter gently rather than jab it. A faster shutter speed is very helpful. Small hand movements can also be helped by image stabilization. Leaning against a wall or table can help to make the shot steadier in low light.
Sometimes you’ll want to use manual focus, for example in macro photography or low light, or when the camera is having trouble locking on to your subject. But for basic photography, autofocus is usually better for beginners. It is faster, more reliable and easier when subjects move. Learning the autofocus modes can often make photography less frustrating.
This content was created by AI